Sunday, October 20, 2013

How to make coffee body butter

This post will guide you through how to make a delicious coffee body butter.  If you'd rather buy it, the link to purchase is at the bottom of this post


To make this recipe, you'll need:

6 oz coffee butter (or other soft butter like mango or avocado)
6 oz Shea Butter
1.5 oz oil ( I used half sweet almond and half argan oil)
Fragrance oils- I used vanilla and a hint of caffe latte (coffee butter has a strong fragrance already)
2 heaping tablespoons-Arrowroot powder, cornstarch or modified tapioca starch
Preservative (if for other than personal use)
Double boiler or glass bowl and pot
One of these: Immersion blender(stick), stand mixer, hand mixer OR fork

Before you begin you want to disinfect your equipment and workspace.  It's best to use a solution of bleach and water or if you don't have that on hand you could spray everything down with isopropyl alcohol and let it sit for a while then wipe with clean paper towels. I use a new role of towels for each project. 

First you want to melt your butters and oils in a double boiler. If you don't have one, that's okay. You can just use the heat safe glass bowl set on top of a pot with water in it on the stove. Stir over low heat until everything melts together. Don't put butters in the pot directly over heat or microwave them. They can burn and Shea can become grainy if overheated.  Unfortunately I didn't get a picture of it pre-melted.
After you've melted your ingredients, remove the bowl from heat and place it in an ice bath. As you can see, I have my glass bowl inside an ice bath in a larger bowl. My ice bath is mostly ice and a little bit of water. Be careful not to get water into your oil mixture. It can cause dangerous bacteria and mold growth. Even though it's not necessary to preserve in a recipe only containing oils, I always use a preservative, because of the possibility of contamination.

Now you want to continuously stir your mixture to cool it down. When it starts to cool but it's not yet solid, you can add your preservative and fragrance. Make sure to use the manufacturers instructions for percentage of preservative and fragrance in your products.  You can also add your arrowroot powder, tapioca starch or cornstarch at this point (I used arrowroot powder). It helps make your finished butter less greasy
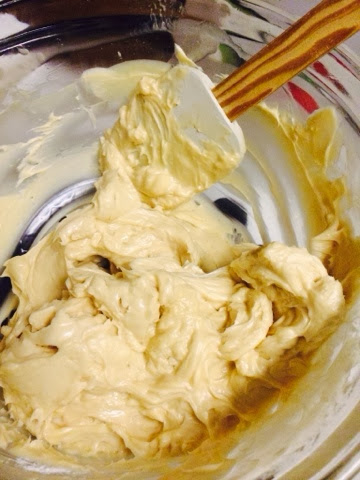
As you stir, the mixture will start to thicken against the sides.  I use my spatula to scrape into the center and continue to stir.
When it starts to look like custard, it's time to get out your blending tool of choice. I like to use an immersion blender because it gives me just enough control. Some people like to use a stand mixer or handmixer.  If you don't have any of these mixers on hand it's okay to use a fork but you'll need to remove the bowl from the bath to whip by hand. When I use my blender, I mix in pulses an make sure to regularly scrap the sides. It should take just a few minutes to get to the right consistency with a blender or up to 20 minutes by hand. It is possible to over whip your butter, so make sure to stop when it looks right. It will start to get fluffy and peaks will form when you dip a spoon in. 
Congratulations! You just made your own amazing coffee body butter. Package your butter in clean jars and enjoy. This recipe made three 4 oz jars. When I scraped all my equipment in an effort to get some for me to keep, I got an additional 2 oz, so make sure to scrap. 
I hope you enjoyed this tutorial. Please let me know how it goes when you try it or if you have any questions. If you'd rather buy than make, this butter is available in my etsy store. 

Monday, October 14, 2013

Anti-Acne Mask with Honey and Coffee

This mask is a really great DIY treat.  The best part is that you probably already have these ingredients in your house.  This is not something that is for sale in my shop, but is just for your enjoyment.  

This mask is great if you have acne-prone skin.  The nutmeg exhibits astringent and anti-inflammatory properties while the honey and cinnamon are antibacterial.  Adding coffee into the mix reduces swelling and puffiness. 

*Nutmeg is a strong astringent, so if your skin is very sensitive, you might want to reduce the amount of nutmeg you use*

First gather your ingredients: honey, cinnamon, nutmeg, and coffee.  If you want it to have a seasonal feel, you can replace the coffee with Trader Joes Pumpkin Pie Spice, which includes cloves, cardamon and lemon.  Also you will need a small bowl and a teaspoon.


First mix together the nutmeg, cinnamon and coffee (or pumpkin spice).  I use about a half teaspoon of each dry ingredient.


Then add 2 teaspoons of honey.  Stir until the dry ingredients are absorbed.  Make sure to crush out any clumps using your spoon.  This recipe makes two applications of this facial mask.  If you only want one application, you can half the recipe. Or it will also keep for several days, covered, in the fridge.  I haven't tested it beyond that, but given the ingredients, it should keep for a while.  To make it last longer, avoid using your fingers, scoop it up with a spoon instead, and try not to introduce water into the bowl.


This is what the mask looks like ready to apply.  Pull your hair back, and gently massage the mask onto your face and neck, avoiding the eyes.  Let it soak in anywhere from 10-30 minutes.  I like to use this mask in the bath, while I relax.  Before you rinse the mask off with warm water, take the opportunity to exfoliate by rubbing gently in circles.  Then rinse and pat dry.


I hope you enjoyed this tutorial.  Please visit again here or at MY ETSY SHOP


Sunday, October 13, 2013

Brazilian Clay Facial Cleansing Bars

Today I'm going to make some sweet flower shaped Brazilian clay facial cleansing bars.   These bars will also be available on my etsy store-the link is at the bottom of the page.

Clays have numerous benefits for the skin-they help remove toxins, control oils, smooth the skin, and reduce acne.  I've gathered my materials: one silicon mold (from Michaels), 12 oz. goats milk glycerin soap base (from Michaels), red, purple and yellow Brazilian clays (www.brambleberry.com). and a spray bottle with rubbing alcohol . I was going to add some fragrance, but decided a against it.  I wanted to keep these bars as gentle as possible. 


Also, just a note about purchasing ingredients-I only shopped at Michaels for a few things because I'm super impatient.  The molds and soap bases are much cheaper if you order online.

So let's get started. 
First I sprayed my mold with alcohol to aid in release. Then I divided my soap into into three bowls. I heated the first bowl of soap in the microwave ten seconds at a time until it was completely melted. I mixed in my red clay, being careful to crush out clumps. I propped my mold up and poured the soap on the lower side
I repeated those steps, heating the next bowl of soap, adding the purple clay and pouring (but this time prop up the opposite side of the mold and pour on that side) In between layers I spray alcohol to get rid of bubbles and aid in adhesion. Make sure not to let the soap dry all the way in between layers or they will separate when unmolded.
Repeat again with the yellow clay , but this time lay the mold flat. After pouring , spray with alcohol to  smooth the soap. You can also use a heat gun to fix any imperfections. Be careful use it on low and not to focus it too long on any one spot-it is very hot and could potentially melt your mold.
Let the soap set for at least several hours before unmolding. Really, it's much better to leave it until the next day, but I can never wait. Let your soap sit flat and covered for a few days before use. I've used it the next day and had it be fine , but if it's not all the way ready, you risk it getting a weird gummy texture. 
And here they are all ready to go. I hope you enjoyed this tutorial and that you will have fun making your own soaps. If it just seems like too much work, these soaps (along with many other great products) are available in my etsy shop at MY ETSY SHOP